


I have a few Sylvanian Families figures that I have replaced with newer ones over time. These figures are faded, have damaged flocking and some even have bald spots here and there. All of them have some form of play ware, or are white figures that got so dusty that tape and toothbrushes don’t do the trick anymore!
So, I came up with the idea to “recycle” these critters into brand new ones for me and my son to play with!
My first attempt was to create a family of cheetah from Easy Buy bears. They worked quite well, but the painting and creating is very time consuming. It also takes a TON of research before I feel comfortable to try my hand at making a new animal.
My latest creation was inspired by one of my favourite Sylvanians, PC Bobby Robberts! I walked past my display case, and he was just begging for a story… But as I was typing it up, with him in front of me, I realised that he was quite a lonely old fellow, and that he needed a companion!
So, Miss Leonora Ratel was born!

In South Africa, we don’t have badgers with white stripes. Our honey badgers or “ratels” are quite fierce and look a bit different from the Underwoods and dear old Bobby. I dug around in my spare Sylvanian Families bin (My little one’s Sylvanian drawer…) and found my old Underwoods! Their flocking isn’t great, but I chose the better one of the two, and got to work with my paints.
My first order of business was to make sure that my figure was clean and free from anything that might compromise the paint from sticking. This figure already had black marker over the black bits as you can see - this is often the case with secondhand figures and can be a big bother, especially when they bleed out colour into the flocking. Although some markers are colour fast, most markers do bleed either red, green or purple when they get wet though, so be careful of them!!!
After drying, I went to town with my paint. I used plain craft acrylic, because that is what I had on hand. Use a small sable brush (Mine is 5mm wide) and dab most of the paint off on a kitchen towel first before you approach your critter. Then lightly brush the paint in small circles of about 5mm in diameter, all over the area that you want to paint. MAKE SURE you don’t leave any blobs of paint, no matter how small, on the brush / figure – they will harden the flocking when they dry!!!


After you have painted an area with a light coat, LEAVE THE FIGURE TO DRY COMPLETELY BEFORE THE NEXT COAT OF PAINT!!! I cannot stress this enough! If you rush, you ruin the flocking and you will be stuck with a figure with hard flocking for all eternity…
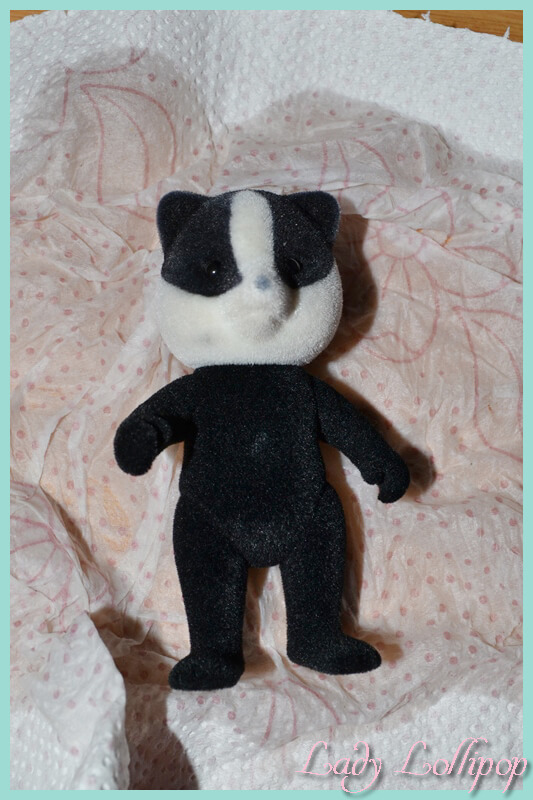
These photos are only after 7 coats of paint to get the white covered and to blend the black into a consistent shade with the previously white areas.
My figure doesn’t show it in the photos, but the flocking on the back of her head is very thin and almost balding in patches. I covered that as best I could. Another tip – while you are painting, if you are noticing bits of flocking coming off, you are brushing too hard. The key is to go lightly and slowly and to get the paint to stain the flocking on all sides.
It is also never a bad idea to have an old towel / sponge nearby to dab at the figure to remove any traces of excess paint before it dries. Also remember to clean the eyes with a Q-tip and water before the paint dries, since it gets tough to remove if the eyes are scratched. If your Sylvanian Families figure has dull / scratched eyes, take a very fine nail buff file, file out the deep gouges as best you can, and go over them with clear nail polish.

My next order of business was to create the white back for my little ratel. To do this, I lightly marked out the areas I want painted, in white pencil, and start going over the lines with my white paint. After some coats to the outsides, I started filling in the centre bits.

My reference Ratel has lighter and darker white patches, so I tried to mimick this a bit on my own Ratel. The outsides of the white bits also seem to almost outline the white area, so I also added more white to the edges.

After another few coats of paint, I ended up with something that looks like this. The ratel is taking shape, but not quite there yet. The edges still need cleaning up a bit, and the shading isn’t to my liking yet. This was after about 4-5 layers of paint.

Some more work and particular attention to the head area of my ratel, gave me this result. I decided not to take the white bit on her forehead down too low, because she looked so angry in all of my tries with the larger white area on her forehead… In the end, she ended up with only a slight bit of white creeping over her head.

The paint in this photo was still wet, but it dries a bit better than this. Especially if you dab at it with a sponge to remove the heavier bits still visible on the photo!

After I was happy with the colour of her white stripe, I masked off the edges, and started dabbing at them to make them the darker white that the reference photo has. I also wanted them to be a bit cleaner than the brush alone gave me. The masking tape doesn’t stick to flocking very well, so I found myself doing small areas at a time to get the best results.

MAKE SURE the paint is dry before removing the tape!!! You might ruin hours of work by being too eager to remove the masking tape… After a few hours’ dabbing and blotting, my badger was finished and I was happy with the result!
Finally, I am able to introduce the lovely Miss Leonora Ratel! She has found some lovely imported dresses (Thank you Bogi!) in Madeline Merryweather's boutique and is ready to find her soul mate in Rooibosch Hill.

